Sunday, 23 December 2018

Board and guards

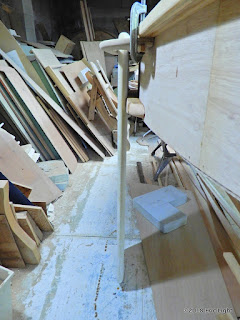
Board and board guards assembled for the first time:
Board is parallel to centreline.
The pivot bolt goes through the centre of the lower board guard.
The blemish on the lower board guard is a knot, which will be filled.
The upper board guard is three layers of ¼" ply and follows the curve of the sheer.


Tuesday, 18 December 2018

Bits and pieces

Now that the mast is done I can finish and install the mast partners and step. Below are the two pieces that make up the mast step. On the left, a piece of cedar with a slot in it. This is the bottom layer. The slot is for drainage. On the right, a sturdy piece of fir to hold the mast in place:
Below, the two pieces of the mast step are fitted together...
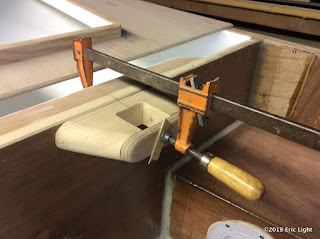
...and then glued with Titebond III and clamped:

The mast partners are shaped. Below, they're clamped in place:
The plans call for a 5/16ths-inch thick bolt to go on either side of the mast opening.The gate is two pieces of ¼" ply glued together to make ½" thickness.

Below, the lower board guard gets checked out with the board in place:
(A template is standing in for the upper board guard.)
I had to put some foam chunks under the boat to lift it up, since the board is 4' long!


Monday, 17 December 2018

Mast shaped

Boring photos, but for the record, the mast is shaped.
Heel.

It ended up curved in two directions. I cut the curve out by trimming the mast on the band saw, first drawing the outlines using string for making straight lines from the top to a point 2' above the heel. I brought my 5' steel rule against the string and made a pencil line displacing the string.

Tip.

The top ended up being only 1" square as a result of cutting the curves out, rather than 1½" as called for. I'm confident that 1" square will be fine, since there's so much fir in the mix. It's good fir with no knots, heavy and strong. The mast is 11' 10" long, 2" square at the base up to 24", then tapers to 1" square at the top.

I decided long ago that my mast would have a square section with rounded corners, and that's what I did. I don't see a reason to take any more wood away, compromising strength. At this size and with a non-racing boat, it doesn't matter if the mast is not foil shaped. It doesn't even need to be straight, since the sail doesn't end at it, but floats past it. A reasonably straight branch would work!


Wednesday, 12 December 2018

Avast*—a mast!

I need to learn to re-read the instructions before I do something like this. The mast was supposed to be pine or something else light. I didn't get the message, and bought fir, which makes it really heavy. So I put a layer of cedar in-between two layers of fir. It'll be a very strong mast! Maybe I'll make it a bit smaller in diameter.
More than half of those clamps are John's, and he helped me to clamp it. Thanks, John! We put a string down the middle and eyeballed it for straight, taking out a curve by drilling long screws into the floor in key spots and putting wedges between the upright screws and the mast until it was straight.
I used Titebond III for this as well. It was 8º and the glue bottle says it needs at least 7º(C), so it's going to work fine.

Also

My Polysail kit arrived today. Thanks, Dave!
Something I really like about the polysail is that it floats. I nearly lost my sister JoAnne's CL16 jib one time, as it sank really fast! 

So, with the enclosed ends on the boat, the extra buoyancy the seats will add, and the buoyant sail with its wooden spars, this boat will not turn turtle very easily. In the event of a capsize, it should lie on its side with most of the boat out of the water. The amount of water that will need to be bailed after righting should be minimal.

I think I'll save sail making for the really cold weather when it's just too cold to work in the unheated shop. I plan to make the sail in my apartment building lounge. Just don't tell anyone, okay?
😁

* I also need to look up words before I use them. I didn't realize that "avast" means to stop or cease!