Sunday 20 January 2019

Hatch cover, new tiller design & gluing

I used two layers of 1½-oz mat to make the hatch cover, with an extra two layers around the vertical sides. It came out of the mold without a problem:
The green stuff is the Partall mold release stuff. Whatever doesn't peel off dissolves instantly in water. The white thing sitting in the mold is a piece of high density plastic that I made into a wedge/pry bar. What really popped the part out of the mold after I loosened it with that tool was compressed air. Magic!
So, here it is:
It was too tight at first to go on, so I ground off some of the wood around the perimeter of the deck opening.
I was planning to cut it down so it wasn't so high, but it's shaped wider at the bottom to facilitate it coming out of the mold, so cutting material off the bottom would make it fit tighter yet.
So I'm not totally happy with it and may just make a flat ply cover same as the after one. We'll see. It may grow on me.?

Meanwhile, I've decided I don't like the tiller I carved out of the two-by-four, so I designed one to be made of layers of plywood, since I still have a fair amount of it left over:
 I'm making the bottom version. The grey vertical bit is the pivot bolt that attaches it to the rudder head. The space aft of it on one side is for the downhaul line that will keep the rudder blade down. I realized that I had to bring the line around that neutral point so that I could lift the tiller without changing the tension on the downhaul line.
The new tiller has a nicely curved profile:
Something like that, anyway. We'll see how it ends up. It's a lot of fussy drawing and sawing to get all the pieces right. A CNC cutter would be nice, but an extravagance for this endeavour.

It's too cold in the shop right now (down to 3 and 4 degrees C at night) to use Titebond (which needs 7ยบ, they say), so I'm gluing the tiller up in my bathroom at home. I don't want a glue failure at sea, that's for sure!
Heavy things I found around the house. The black container was from shipping olives. It's my emergency water supply for when "the big one" hits the west coast. The wedge is keeping it from tipping over.


Tuesday 15 January 2019

Hatch covers, oar pieces

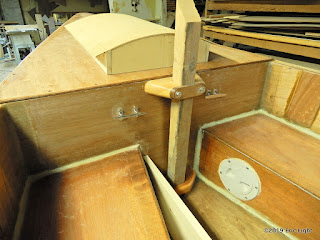
I was going to duplicate the way I secured the after hatch on the kayak for this build, so I installed the tie-downs for that system. But it turned out that I put the tie-downs so close to the hatch cover that it was impossible to lift up the lid. Here's the kayak arrangement:
The shock cord goes out to the sheer, which gives enough play that the cover can be lifted without having to undo anything.

Here's the present work-up, to be tiddled-up later:
Jim Michalak, the designer, shows a single two-tiedown-one-hook system in his book, Boatbuilding for Beginners and Beyond. Since I already had the four tie-down loops installed, and since I thought it wouldn't add significant work to open the hatch, and would even make the boat more seaworthy, I did a double-Michalak.

Meanwhile, the mold for the forward hatch cover has received its outer gelcoat layer:
I first waxed the mold, then just before John sprayed the gelcoat on, I sprayed several thin coats of partall, drying it between coats with a hair dryer. John says you don't want your piece hanging around with just the partall on it, because it picks up dust and dirt.

Next it will get "dusted" with a light spray of dark blue, to show up any air bubbles in the layup so they can be worked out. Exciting!

Finally, here are the oar pieces, cut out but not yet glued up:
It's too cold to use Titebond without concerns, so I'm planning to use epoxy (WEST) to glue the cheeks on, which will fill out the handles and looms. Those two 8'-long boards represented a lot of band-sawing, with more to come! Could not have done it without, though. The pieces fit so closely together on the board layout that the cuts had to be right next to the line or I'd be cutting into the next piece. Here's my drawing of Jim's plan for oars:
Jim's oar plan is for 7' oars, and the cockpit on this boat is 6'6", so I had to shorten them by 6½". I didn't want to shorten the blade too much relative to the rest of the oar, so I spread out the shortening: I took 3½" off the blade, 2" off the loom, and 1" off the section between. I drew it out for 78", then cut ½" off the end of the blade, since it wouldn't quite fit in the cockpit otherwise.

Thing is, there's not a good place to put the oars in this boat where they won't be in the way. But I have a plan. Stay tuned! ๐Ÿ˜€


Friday 11 January 2019

Board, rudder, cleats, oar start

The board installation is complete:
Eight ⅜" bolts fasten the upper guard to the rub rail.

I priced the commercial gudgeons and pintles and found they'd be around $100 taxes in, so came up with a different idea that I haven't seen before (at least, not that I remember).

I found a piece of aluminum channel offcut in the shop bin, cut two 1½" slices off of it, then cut each in half to make four simple right angles. Here are two finished pieces:
I couldn't get John to give me his last piece of aluminum rod, so I bought a piece of ½" Acetal rod. Fortunately, John had a ½" bit. So nice to have a band saw and a drill press! Aluminum cuts just about as easily as wood. Here are the pieces pre-assembled:
Notice that the hole for the rudder pivot has been strengthened with glass. The rudder stock has a layer of glass mat on it where the blade will rub, and I glued and screwed a piece of hardwood on the lead edge so I could attach the aluminum pieces to it. It just happened that I had space to stick a piece of high density plastic for the rudder stop. The blade itself is re-purposed from the leeboard I made for the sailing kayak, original hole filled, a slot made in the top for the downhaul rope to travel in.

Here it is all together, with tiller too!
I thought I was going to lead the rudder uphaul and downhaul lines along the tiller and cleat them to it, but seeing it for real, I see that if the down-haul line is cleated, then the tiller won't be able to pivot up, which I would like it to be able to do. I'll have to come up with a work-around.
The tiller was cut from a spruce two-by-four. I drilled the pivot hole before cutting the slot for the rudder head. That was tricky; fortunately I found a long ¼" bit in the shop.
 
The rudder head needed to be quite tall to put the tiller over the aft hatch cover. Seeing the photos, I'm thinking now to carve a chunk off the back, possibly like so:

I bought some one-by-six spruce for the oars. The middle layer goes handle to blade, then a smaller piece gets glued either side of it to thicken up the loom and handle. There isn't really a good place to store the oars, so I'm making them short enough (6'5½") to fit in the cockpit:
If you look closely enough you might see the oar drawn on the board. My intention is to be able to secure the oars off the floor just inboard of the seats such that I can use them as hiking straps. We'll see how that goes! I don't want them rattling around loose on the floor, and I don't want to be sitting on them.

In the next photo the oar core is nestled close to what I imagine will be the final spot:
Notice the cleats for the halyard (starboard) and downhaul (port) have been installed. The rough 2x2 is standing in for the mast. I wanted to make sure I wasn't going to be knocking my knuckles against the mast or the seats when cleating a line. I originally wanted to put the cleats in vertically, but found that my hands were bumping into things, so they went in horizontally instead. I put a board across inside to tie the cleats into, for extra strength:
I'm thinking it'll provide something to screw hooks or whatever into, to secure stuff. Maybe I need something else in there to attach tie-downs to?