The board installation is complete:
Eight ⅜" bolts fasten the upper guard to the rub rail.
I priced the commercial gudgeons and pintles and found they'd be around $100 taxes in, so came up with a different idea that I haven't seen before (at least, not that I remember).
I found a piece of aluminum channel offcut in the shop bin, cut two 1½" slices off of it, then cut each in half to make four simple right angles. Here are two finished pieces:
I couldn't get John to give me his last piece of aluminum rod, so I bought a piece of ½" Acetal rod. Fortunately, John had a ½" bit. So nice to have a band saw and a drill press! Aluminum cuts just about as easily as wood. Here are the pieces pre-assembled:
Notice that the hole for the rudder pivot has been strengthened with glass. The rudder stock has a layer of glass mat on it where the blade will rub, and I glued and screwed a piece of hardwood on the lead edge so I could attach the aluminum pieces to it. It just happened that I had space to stick a piece of high density plastic for the rudder stop. The blade itself is re-purposed from the leeboard I made for the sailing kayak, original hole filled, a slot made in the top for the downhaul rope to travel in.
Here it is all together, with tiller too!
I thought I was going to lead the rudder uphaul and downhaul lines along the tiller and cleat them to it, but seeing it for real, I see that if the down-haul line is cleated, then the tiller won't be able to pivot up, which I would like it to be able to do. I'll have to come up with a work-around.
The tiller was cut from a spruce two-by-four. I drilled the pivot hole
before cutting the slot for the rudder head. That was tricky;
fortunately I found a long ¼" bit in the shop.
The rudder head needed to be quite tall to put the tiller over the aft
hatch cover. Seeing the photos, I'm thinking now to carve a chunk off
the back, possibly like so:
I bought some one-by-six spruce for the oars. The middle layer goes handle to blade, then a smaller piece gets glued either side of it to thicken up the loom and handle. There isn't really a good place to store the oars, so I'm making them short enough (6'5½") to fit in the cockpit:
If you look closely enough you might see the oar drawn on the board. My intention is to be able to secure the oars off the floor just inboard of the seats such that I can use them as hiking straps. We'll see how that goes! I don't want them rattling around loose on the floor, and I don't want to be sitting on them.
In the next photo the oar core is nestled close to what I imagine will be the final spot:
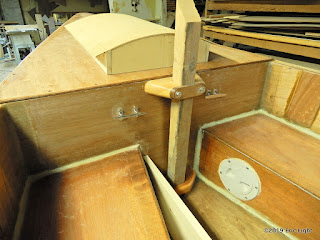
Notice the cleats for the halyard (starboard) and downhaul (port) have been installed. The rough 2x2 is standing in for the mast. I wanted to make sure I wasn't going to be knocking my knuckles against the mast or the seats when cleating a line. I originally wanted to put the cleats in vertically, but found that my hands were bumping into things, so they went in horizontally instead. I put a board across inside to tie the cleats into, for extra strength:
I'm thinking it'll provide something to screw hooks or whatever into, to secure stuff. Maybe I need something else in there to attach tie-downs to?


No comments:
Post a Comment