Friday, 26 April 2019

Weighing in

The plan is, when the time comes to take the boat out of the shop, to lower it from the mezzanine by rope. So today I set about putting together the lift ropes.

A few days ago, Bruce and I found that when we lifted the boat from the position of the oarlock sockets, the boat was bow-heavy. Bruce suggested using the mast partner as a forward lift point. The main lift will come from a rope that goes (through a couple of pool noodles) around the bottom of the boat and up out the oarlock sockets, with the two sides tied together above the centreline of the boat to make a yoke. The rope is knotted just above the socket on each side, so it won't slip. The yoke is tied to the mast partner to make a pyramid shape.

Today I found a chain-fall lifting mechanism in the shop. With friend Vladi's help, we set it up over the boat. I was then able to lift the boat myself and fine-tune the balance point, setting the boat down each time to re-position the knots.
I had brought my bathroom scale, so I put some foam chunks on top of it and set the boat down on it:
The bathroom scale is the pink and black thing at the bottom of the pile above. You can see that the lifting rope that goes through the pool noodle is slack. I got this picture...
by sliding my iPad in under there.

The boat weighs 140 lbs, about what I expected.


Thursday, 25 April 2019

Pretty much done

The cockpit floor has some sand-like stuff sprinkled into the paint (Tremclad) to keep me from sliding around on it, and to keep my knees raw when kneeling, I guess.

Here she is in sailing trim, coming...

...and going:
I noticed that the rudder and tiller are well-balanced, weight-wise, meaning that they'll stay in position, no matter the heel of the boat. Not sure that has anything to do with on-the-water performance, though.

Here's the off-centre board in the "up" position, with a catch-string for when the boat comes ashore:

And here it is in the "down" position:
The jam cleat on the left springs open if there's a sudden load on it, in case we hit a rock.

Now here she is in rowing trim:
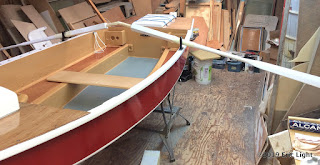
The rowing thwart is untreated cedar, which I'm going to leave unfinished. It has some sheet foam glued to the underside where it lands on the bench tops, so it won't move around. I taped the oar handles together to get a sense of what they would look like in action.

The photo above shows how short the oars are (too).

As does the photo below. I'm going to be windmilling with these, I think. 😒
Looks like the oars will barely be in the water at this angle. I'll use a couple pieces of thick foam (the hard stuff) to pad the height of the thwart.

Next tasks: finish the dolly and the sail.


Saturday, 20 April 2019

Cockpit paint

Fortunately, I'll be able to finish this project before the shop gets cleaned out and closed down, since there's so little left to do.

It was so cold that the primer I used on the cockpit took over a week to harden up. Today I finally got a first coat of the buff Brightsides paint on it:


The bench seats are varnished and masked. I'm not sure if I'm going to like the buff and the varnished wood together. I had planned to have the decks buff as well, but they looked so good finished bright!


Oar locks and collars

I hadn't thought when I bought them that the oarlocks might not fit over the square looms! So then what?

They may have fit if I had soaked them in boiling water first and then tried to force them over the handle end. But until I had carried out my plan, I didn't know how soft the hot water would make the plastic; I had low expectations. So I cut the oarlocks, on the outer, upper part of their curve, hoping to open them enough to get the small part of the oar, where the loom meets the blade, into the oarlock. First I tried heating the plastic with a hair dryer, but the cut wouldn't open far enough.

That's when I tried the boiling water trick, and it worked really well. A few minutes in a cup of hot water made the plastic very pliable. Afterwards, I taped the cut closed by squeezing the two sides together (shoulda taken pics), wrapped a piece of glass cloth saturated with epoxy around the cut part, and then draped some carbon fibres over that.


It doesn't look great, and the epoxy isn't sticking to the plastic, but I'm expecting the shape of the sleeve alone to hold it together. It's not a high-stress part of the oarlock.


The collars were made with a wrapping of braided nylon line. The ends of each line were fastened to the oar with square copper tacks. The wrapping was coated with epoxy, with a dab of thickened epoxy on each tack head. (The oarlock cannot get past the bulge, so no buttons are needed on these collars.)

After the epoxy on the collars hardened, it was sanded with 40-grit, leaving them a bit fuzzy, since the nylon fibres don't shear off, but stand up. That gives them a soft feel. I expect it will mean that rowing will be a bit quieter. For sure, the oars will be very strong in that area!

I plan to carry a pair of open-top oarlocks in the boat. If the present oarlocks fail miserably, I can always use those instead, and cut these off.


Friday, 12 April 2019

Cockpit paint

The proprietor of the shop, John Booth, died suddenly and unexpectedly this week, so I'm putting in more time in order to get my project done so the shop can be cleared out.

The decks have been installed with Sikaflex and #10 screws. Notice the seatbelt webbing tie-down on the forward hatch.

I've masked the areas on the seats that I want to remain bright, and the rest of the cockpit is getting a couple coats of primer before it gets painted.


Varnish!

I wasn't going to leave any of the mahogany plywood "bright", but it happened anyway. I had used up the leftover resin from putting things together to seal the plywood, intending to paint over it all. Trouble was, it was unwaxed resin and I couldn't sand it without gumming up and throwing out sandpaper, so I put some waxed resin on top.

When I saw how nice the wood looked bright, I decided I didn't want to paint it! At least, the decks and the seat tops.

The decks were varnished on the bench and set on the boat for someplace to put them while the varnish dried.


The tape on the gunnels was to keep the varnish that was leaking through the screw holes in the decks from getting on the gunnels.