Wednesday, 6 April 2016

Amas & placement

The sides for the amas got a layer of 4-oz glass:

Checking out the ama placement:
The stick is 7' long.
The waterline is just under the main hull chine amidships.


Monday, 4 April 2016

More coaming & lip

When I put the pieces together, the coaming was too high with three layers of ⅜" foam, so I used two layers instead.
Couldn't decide what to do with the after end of the coaming, so I just cut it off at the end of the cockpit and rounded it. It should really end better. Maybe I can come up with something.
 
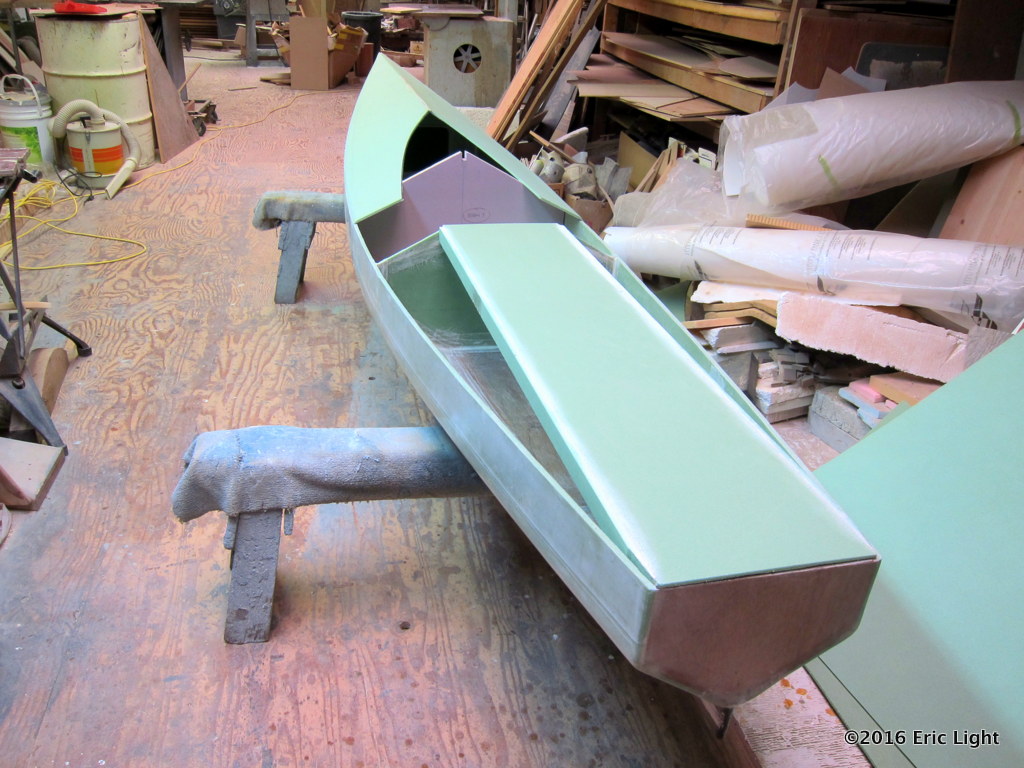
Coaming and lip are now glassed (need finishing). The hull is basically done, could go paddling tomorrow, but I'll restrain myself. Still lots to do.
(Maybe what I'm calling the hatch lip is actually a coaming as well?)


Friday, 1 April 2016

Coaming and lip

I put the first layer of the cockpit coaming on today:

Here's the plan:
The forward-most part was done with a smaller piece, and the side pieces were long, without too much curve. There's always a loss of material when cutting out pieces like this, but there's enough here to complete the job, with probably some left over.


The deal is, this stuff will bend nicely if the outside of the curve has been lightly glassed. The epoxy resin is quite flexible when thin. The foam compresses on itself, making itself denser and possibly stronger—if that makes any sense. If you try to bend it with the glassed side on the inside of the curve, the glass just cracks and splits in a straight line as the stuff folds neatly in half.

Here's more foam-bending goodness:
I measured and cut long, put each bend in gently in sequence, then cut the ends to match.
The bends need to be forced into the corners, but once there behave well.
That aft hatch opening reminds me of a submarine. . . Maybe I should paint it yellow? If I did—and that's a very big "if"—it would have to be a bright, rich yellow, like this:


Wednesday, 30 March 2016

Decks glassed, cut

I put in a long day on this part, since I wanted to not have to do any washing and sanding between coats, putting the next coat of epoxy on while the previous part was still tacky.
 
To keep the sanding and filling of the edge to a minimum, I did what Andrew told me about: I put masking tape where I wanted the cloth to overlap to:
And cut the glass with a utility knife along the top edge of the tape when the resin was still "green":
It worked well.

Here's the cockpit opening being cut out more, new shape on the left:

Now the aft hatch opening is cut out as well:

What you don't see is the hull-deck joint being filleted and glassed on the inside. A fair bit of work was required using long-handled tools to reach into the nether regions in the ends of the boat where no-one will go or see, but needing be done for integrity of the build. I used a large LED flashlight for light, with the boat upside-down or on its side.


Friday, 25 March 2016

Decking complete, baby born

Before I put the aft side decks on, I made some hanging knees and installed them at the after end of the future hatch opening:
This is looking forward, at the aft side of the cockpit bulkhead. The temporary pink foam form is there to keep the deck angle consistent. The green tape was unnecessary. I wanted to keep splash off the untreated foam, but there was none.

One side deck on, the other gooped and ready:
Like my advanced-design stool? :-)
 
Aft side decks on:

A baby boat was spotted alongside its mother near Victoria Harbour:

I started two amas to my intermediate design, out of doorskin for now, so I can see how they go without too much outlay. I wanted to see the two sizes together. The ama looks small to me at this point. It could be longer, but I don't want it deeper, as it will drag.

I like how similar the bow shapes are:

The whole ama:
Just wired together for now, cross-piece screwed on to hold the top open. The ends are identical. The placement is wrong here, though: the top of the ama will be closer to the sheer line of the main hull, and the ama will be farther out from the main hull. I'm guessing the akas (what we used to call cross-beams) will be 7' long.


Wednesday, 23 March 2016

Decking + new ama shape

The foredeck formation was perfect. Here's the foredeck going on top of epoxy goop on the top edge of the hull sides:
Trimmed:
Gradually filling the gap where the two sides meet at the apex.

I stuck some stringers on the edges of the aft deck flat, with a cross-beam at the aft end of the hatch opening (the end pieces are temporary):
A layer of glass went on the underside of the deck, then a layer of carbon fibre tape went down the middle of it:
The left side will be cut out and made into a hatch opening after the deck is installed. I need it there now to hold things in their proper places.
Here it is, installed:
The hardest part was reaching in to put a fillet with glass tape on the transom-deck joint. I could just poke my head through the widest part of that opening to see the transom. Since it was either my head or my arm that went in there, I had to do that joint blind. But looking in, I see that I did a stellar job. I wet the glass tape out in advance on the table, put the goop in with a round-end stick, and pushed the wet-out tape on, smoothing it out with my gloved fingers.

Next came the aft side decks:
The cockpit opening will be widened and rounded more, after the deck gets glassed.

The underside of the aft side decks got a layer of 4-oz glass cloth:

Ama, Ama—Who's got the Ama?

Here's the latest model of the ama shape. It's half-way between the first one and the second. The first had a straight bottom for four of its six feet, while the second was entirely curved with no straight on the bottom. This one has two feet of straight, with two feet of curve on each end:
I like that this one mimics the shape of the bow of the main hull. The extra flat on the bottom gives more buoyancy compared with the one that's all curved.


Wednesday, 16 March 2016

Foredeck formed

Ran into a little problem when trying to bend the foredeck into a vee: in a few places, the edges of the panels were bonded where the resin had run between. I kinda hope that happens when I'm doing a butt joint, but I forgot to predict it for this. I ended up cutting the foam right beside the resin that joined the edges, making a new edge. The glass tape did not rip, as I had thought it might. In fact the whole thing was remarkably sturdy with just the one layer of 4-oz cloth on it; I could wave it around and the joint didn't move.

I put two lengths of 3" carbon fibre tape in the bottom of the vee. One was cut into two pieces lengthwise, one wider than the other, so there are three layers of the carbon tape in the centre of the vee. Also two layers of 2½" glass cloth, one under and one over. John says this boat is massively overbuilt (now he tells me!), reminding me that every little bit adds to the weight. It's true it's getting heavier, but I'm under no illusion that I'll be able to lift it with one hand—let alone spin it overhead. ;-) And I would like it to be sturdy rather than flimsy.

 I also put a single layer of carbon fibre tape athwartships right at the forward end of the cockpit, and another forward of where the forward bulkhead will be, to stiffen and strengthen the decks. After all, this boat is meant to sail, and the deck will be the upper support for the mast.
Tomorrow that stick comes out.