Wednesday, 30 May 2018

Buoyancy tanks

The first buoyancy tank built was used as a mold that I waxed and applied Partall to, and built the second tank around: two sides and end, in a thin layer of fibreglass. After I coaxed the original tank out of the new shell, I closed in the top with a piece of the same urethane foam that I built Golightly out of, and glassed it to the sides.

Now there are two buoyancy tanks. After I took this photo, I used some hook and loop webbing to tie them in. Neatly. I didn't want to attach them permanently, but wanted to be able to take them out if I wanted to.


John thinks I'm fussy because I prefer things neat rather than carved out of chunks of styrofoam or something. I agree wholeheartedly: I am fussy! 😀


Monday, 28 May 2018

Bobber Ann named

First, she was painted with two coats of Pettit Easypoxy semi-gloss white.

I really enjoyed the translucent quality of the clear-finished cloth, but cringed every time I saw the boat baking in the sun in a parking lot on top of the car.

Aesthetics are always top of mind, but practicality comes just ahead. After all, it wouldn't do to have a pretty boat that fell apart due to sun damage.

Lettering positioned.
Overlay coming off.
"Fredly" font has a break between the 'e' and the 'r' that I closed using Illustrator.
She's "Bobber Ann" because she's so corky. And because I enjoy the song. (Yes, I know it's technically "Barbara Ann", but I spelled it the way the Beach Boys sing it.)

Above the name you can see the racing stripe that I painted over because it wasn't coming off well.
I thought it would be easy to find racing stripe tape, but it's not. The skinny one is dark blue, and an official racing stripe.
I wanted a green stripe about ⅜" wide. The green one is ¾" PVC tape such as electricians use. Both are on temporarily (I hope!).
Yes, I could do it the old-fashioned way and paint a stripe on, but I'm too lazy. I don't like either of these solutions, so I'm considering not having a stripe at all now. I can always put one on some other time down the road.

Buoyancy tanks are done and painted. Putting it all together tomorrow. Stay tuned.


Wednesday, 21 March 2018

What to do with Golightly

I found that Golightly was too much to deal with as a car-topped trimaran with my crappy back. Or even as a kayak (Bobber Ann has fixed that nicely!). Friend Andrew suggested I join the Cadboro Bay Sailing Association, so I did.

They don't have a spot in their compound for me yet, but it might happen this summer. Meanwhile, I'll build a proper dolly with fat wheels for crossing the beach, and get out on the water in Bobber Ann (the wee skin boat).

I'll keep Golightly rigged up for sailing (with akas and amas stored on top, to minimize space taken up) and on the dolly ready to wheel to the beach, where I'll put the pieces together. I'll keep the mast and leeboard on, and possibly the rudder as well, if there's space aft.

Cadboro Bay is a great place to sail since it's so protected. There's also access to Oak Bay and Chatham and Discovery Islands. The currents don't get crazy till you get out of the bay.

Cadboro Bay looking SE

Red arrow in the pic below shows where the CBSA compound is at Cadboro Bay, with the short path to the beach. The adjacent compound to the NE is Uvic's. Royal Victoria Yacht Club is at the bottom.


This post is a major departure from routine, since it deals with a possible future, whereas all other posts have been made after the fact. I've kept this plan under wraps since I joined the CBSA last August because I really didn't know if it would happen at all. But I went to their AGM last night and was quite impressed with the calibre of the people, as well as getting some assurance that I would get a spot within the compound in the not-too-distant future.


Also, I've applied for housing in the Niagara region, so doing anything more here was somewhat up in the air. However, I have about five years to wait for housing in Niagara, so I thought I may as well make best use of my time here.


buoyancy tank again

I applied polyester resin to the outside of the buoyancy tank, and when I came back the next day, two of the planks that make up the forefoot (if it were a boat) had sprung apart. Their forward ends snapped off when I tried to push them back into place.

So I left it for the winter and just got back to it. I used bondo and finger-clamped the two pieces back into place, then glued the snapped-off forward end bits back on. The job isn't as smooth as planned, but it's just a buoyancy tank, right?


Monday, 28 August 2017

Around the harbour

Port of Victoria entry instructions 

Of course, when a vessel enters Victoria Harbour it's expected that the captain will have checked their charts and noticed that the main part of the harbour is an aerodrome. 

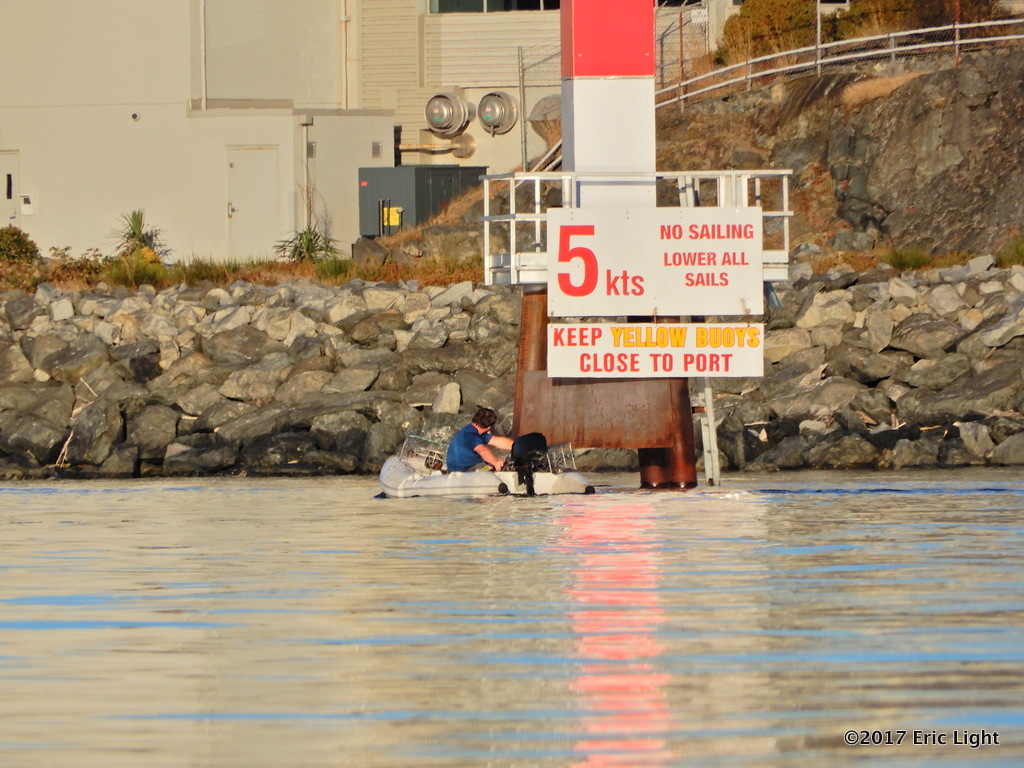
To keep everyone out of the flight paths, there's a line of yellow buoys along the south side of the harbour. The drill is that you keep the yellow buoys to port, such that they act as a highway centreline. The north side of the harbour has a few white buoys. Non-powered vessels (kayaks, etc.) are expected to use the north side, but are not strictly relegated there. Here's a screen shot from the Navionics web app. I've gone over the green lines outlining the airodrome, as they were very faint. The purple lines show the roadway for power vessels. The little harbour ferries can go on either side.


Here's the new sign on the new fixed beacon at the harbour entry, off Shoal Point in the above diagram (Coast Guard station in the background):


Gearing up for a spill

I've seen a number of different spill response vessels around the harbour recently. This is the most colourful.

Like a bird on a wire

Starlings over boat work at the Point Hope shipyard:
It must get right hot in there! At least their sanding dust, etc., doesn't fly around the neighbourhood. Yes, there's a ship under there!


Sunday, 27 August 2017

Buoyancy tanks

Okay, I'm doing it this way:

Took measurements from the inside of the boat, then took ¼" off dimensions to account for foam planking and made a crude form:
The green part is the piece I made for a foot rest earlier, which is now the after end of the forward buoyancy tank. It's held to the form with screws, so I can remove it.

First plank goes on:
It's hot-glued to the aft bulkhead and to the end of the plank on the other side. The planks aren't attached to the forms at all.

Three planks on now:
The little spots you see on the seams between the planks are where I stabbed the seam with the hot glue gun, melting a space into which I injected hot glue. This is so the edges align with one another. This was pretty time-consuming, as I had to hold the pieces together until the glue hardened; about 5 minutes for each spot. But it seems to work.


Monday, 21 August 2017

Buoyancy test

I've started making some buoyancy tanks for the Airolite canoe. I'm not totally sure how I'm going to do them, so I won't post my work here just yet. But I thought I should just check and see how the boat floats without any buoyancy tanks added. So after my paddle this afternoon I shoved her under. Only she wouldn't go! This is as far as she'll go under:
I shoved that low side down, but it just came back up: that's as much water as she'll take. I thought she'd sink much lower.
And I tried to get her to stay inverted, but she just turned back right-side up. Good little boat. (She gets waaaay more comments than the Golightly.)

I'm thinking of calling her Bobber Ann, 'cause of how corky she is. But I may keep that name for the next (slightly larger) one (if it happens), and just call this one Bob. hahaha!
Bobbie?